Navigation: Application Components > Wizards > Import Wizard > Select Source >
A delimited text file


|
Navigation: Application Components > Wizards > Import Wizard > Select Source > A delimited text file |
  
|
Any file or clipboard data containing delimited text can be imported as Info Items with corresponding Attributes using the this type of File Import. This feature is very useful for importing contacts from an email application or contact database, a spreadsheet application, etc.
The data in the delimited file simply needs to be separated with a consistent character (by default a comma [,] but any symbol such as a TAB or ~ could be specified and used).
To import the contents of a delimited text file, just open the Import Dialog, choose Delimited text file, click Next and the following entry fields will be displayed:
Delimited text file to import: Manually enter or browse to the file and path of a delimited text file, or use drag & drop or copy & paste from Windows Explorer onto the edit control.
Load Clipboard: When clicked, any text found on the clipboard is saved to a temporary text file, the filename field updated to this temporary file, and the delimiter changed to <TAB> (since Excel and Word copy tabular clipboard data using Tab as the delimiter). This provides a convenient way to quickly import delimited data copied to the clipboard from other applications.
Delimited Fields and Settings

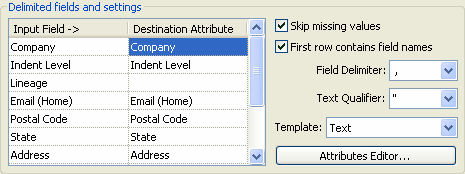
When a valid file has been selected in the Delimited text file to import field, the Input Field -> column of the mapping control (displayed above) will populated with the either the values of the first row of data or "Field 1" .. "Field N" (where N is the number of columns in the first row of data). The second column is used to map the input fields to specific attributes for the import.
Input Field ->: This column is populated with either the names of the input columns (if First row contains field names is checked), or "Field 1" ... "Field N" (where N is the number of columns in the first row of data if not checked). Values in this column are not editable.
Attribute: This column is used to assign existing Attributes to populated with the Input Field -> values when the file is imported. The Attribute names can be selected in a drop-down control displayed in this column. For a Yes/No type attribute, use a non-zero value (i.e., 1) for Yes and 0 for No in the CSV file.
Skip missing values: Checking this box will not create Attributes for input fields with no value provided.
First row contains field names: Checking this box will repopulate the Input Field -> based on Field Delimiter and Text Qualifier settings displaying the values found in the first row of data. The first row of data won't be imported when this box is checked. If the box is unchecked, the Input Field -> column will be repopulated with "Field 1" .. "Field N" as described above and all rows (including the first) will be imported.
Field Delimiter: The value specified in this field is used to identify the separator between delimited values (for a CSV or comma-separated file this is a comma). This value is required.
Text Qualifier: When importing values that contain the delimiter character (such as Kinook Software, Inc. when the delimiter is a comma), many applications will qualify the entire block of text with a different character (typically a double quote, such as this example: "Kinook Software, Inc.").
Note: to import multiple user-defined keywords, use a semi-colon delimiter between the keywords in this csv "value", and map the column to the "Keywords (user-defined keyword)" virtual attribute.
Template: The Info Items created during the import will be based on the template specified in this combo control.
Note: If the Contact or Contact derived template is selected, the Item Title attribute can't be mapped, as these Templates do use a combination of the First Name, Last Name and/or Company attributes to compute the title.
Attributes Editor (button): Clicking this button will display the Attributes Editor dialog, which can be used to add appropriate Attributes for use by the Import process.
Options
Delete Delimited text file to Recycle Bin after import: This check box is self explanatory.
The previous Import Dialog page: Select Source
The next Import Dialog page: Select Destination
Note: Available in Professional edition only.